Δευτέρα 31 Αυγούστου 2015

20λεπτο κυκλικό πρόγραμμα

ασκησεις πανω μερος σωματος
Χρησιμοποιήστε αυτό το κυκλικό πρόγραμμα στο σπίτι σας για άμεσα αποτελέσματα στο πάνω μέρος του σώματος σας και για ένα δυνατό πυρήνα (κεντρικό τμήμα σώματος που περιλαμβάνει την οσφυϊκή μοίρα (μέση), τη λεκάνη και το ισχίο). Ο πυρήνας είναι από τις σημαντικότερες «αλυσίδες» του ανθρώπινου σώματος.

Αυτό το σύντομο πρόγραμμα εκγύμνασης για το πάνω μέρους του σώματος θα σας βοηθήσει για την γράμμωση των κοιλιακών και γενικά θα σας δώσει μια fit εμφάνιση.

Είναι ένα εξαιρετικό κυκλικό πρόγραμμα που στοχεύει στην εκγύμναση του πυρήνα, τους στήθους, της πλάτη, των τρικεφάλων και των ώμων σας. Για να το κάνετε δεν θα χρειαστείτε καθόλου εξοπλισμό.

Ο ακρογωνιαίος λίθος αυτού του προγράμματος, το οποίο αποτελείται κυρίως από γνωστές κινήσεις, είναι η αγαπημένη άσκηση πολλών, η plank (σανίδα) με άγγιγμα στον ώμο. Η άσκηση αυτή εκτελείται τοποθετώντας τα χέρια και τα πόδια σας στο πλάτος των ώμων, τα χέρια σε πλήρη έκταση όπως θα ήσασταν και στην κορυφή ενός push-up. Ενώ κρατάτε το πυρήνα σας σφιχτά, το σώμα σας σε ευθεία και τους γοφούς σας σταθερούς, θα φέρετε το χέρι σας να ακουμπήσει στον αντίθετο ώμο και μετά το ίδιο με το αντίθετο χέρι και ώμο (θα δείτε και τις εικόνες πιο κάτω για να καταλάβετε καλύτερα πως εκτελείτε αυτή η άσκηση).

Αυτή το πρόγραμμα μπορεί να γίνει άνετα σε ένα δικό σας χώρο, στο σπίτι και θα πρέπει να έχει διάρκεια γύρω στα 20 λεπτά.

Το Πρόγραμμα

Επαναλάβετε και τις 6 ασκήσεις κυκλικά για 5 φορές. Χωρίς ξεκούραση ανάμεσα στις ασκήσεις.

1η ΑΣΚΗΣΗ 
Κανονικά Pushup - 20 Επαναλήψεις
Pushup
2η ΑΣΚΗΣΗ
Ροκανίσματα - 20 Επαναλήψεις
Ροκανίσματα
3η ΑΣΚΗΣΗ
Σανίδα με άγγιγμα στον ώμο (Plank with Shoulder Touches) - 10 Επαναλήψεις
Ροκανίσματα
Ροκανίσματα
Σημ: Σηκώστε το ένα χέρι από το πάτωμα και αγγίξτε το στο μπροστινό μέρος του αντίθετου ώμου. Τοποθετήστε το χέρι απαλά πίσω στο πάτωμα. Προσπαθήστε να παραμείνετε όσο το δυνατόν πιο σταθεροί την ώρα που θα σηκώσετε το χέρι σας από το πάτωμα για να το ακουμπήσετε στον ώμο.

4η ΑΣΚΗΣΗ
Situp - 20 Επαναλήψεις
Situp


5η ΑΣΚΗΣΗ
Κλειστά Pushup - 20 Επαναλήψεις
Κλειστά Pushup


6η ΑΣΚΗΣΗ
Jack-knife | Κοιλιακοί με σήκωμα ποδιών - 20 Επαναλήψεις
Κοιλιακοί με σήκωμα ποδιών

Τρίτη 25 Αυγούστου 2015

Ενεργειακές Μπάρες με Ταχίνι


Ενεργειακές Μπάρες με Ταχίνι

 Ενεργειακές μπάρες με ταχίνι_2
Υλικά: (για 12 μπάρες)
  • 1/2 κούπα μέλι
  • 1/2 κούπα ταχίνι
  • 1 1/2 κούπες νιφάδες βρώμης ή μούσλι
  • 1/2 κούπα σταφίδες μαύρες
  • 5 δαμάσκηνα ψιλοκομμένα
  • 1/3 κούπας αμύγδαλα χοντροκομμένα
  • 1/3 κούπας καρύδια χοντροκομμένα
  • 2 κ.σ. σουσάμι
  • 1 κ.σ. κακάο
  • 1/2 κ.γ. κανέλλα σε σκόνη
Εκτέλεση:
  • Σε ένα μεγάλο μπωλ ανακατεύετε το μέλι με το ταχίνι.
  • Σε ένα δεύτερο μπωλ ανακατεύετε τα στεγνά υλικά καλά, για να πάει παντού το κακάο και η κανέλα.
  • Ρίχνετε τα στεγνά υλικά στο μίγμα του μελιού με το ταχίνι και ανακατεύετε με το χέρι. Το τελικό μίγμα θα είναι μια συμπαγής, κολλώδης μάζα.
  • Ρίχνετε το μίγμα σε μια λαδόκολλα, το φορμάρετε σε ορθογώνιο σχήμα και το βάζετε στο ψυγείο για 1 ώρα περίπου για να σφίξει (ή 1/2 ώρα στην κατάψυξη).
  • Μετά από 1 ώρα το βγάζετε από το ψυγείο και το κόβετε σε φέτες πάχους 1,5 εκ. περίπου τις οποίες τοποθετείτε σε ένα ταψί στρωμένο με λαδόκολα.
  • Ψήνετε σε προθερμασμένο φούρνο στους 180 °C (στον αέρα) για 10 λεπτά (όχι παραπάνω).
  • Τις αφήνετε να κρυώσουν καλά και τις αποθηκεύετε σε γυάλινο τάπερ.
ΠΡΟΣΟΧΗ! Όταν βγάλετε τις μπάρες από το φούρνο θα είναι μαλακές. Μην ανησυχείτε όμως γιατί όταν κρυώσουν θα είναι τέλειες!

Ηλεκτρολύτες

Ηλεκτρολύτες: Τι είναι και πώς θα τους αναπληρώσετε

Ηλεκτρολύτες: Τι είναι και πώς θα τους αναπληρώσετε
Οι ηλεκτρολύτες είναι στοιχεία που βρίσκονται στο σώµα και σε υγρά του και φέρουν ηλεκτρικό φορτίο. Η διατήρηση της ισορροπίας τους στον ανθρώπινο οργανισµό είναι σηµαντική, καθώς ρυθμίζουν την κατανοµή νερού στο σώµα, επηρεάζουν το pH του αίµατος και συμβάλλουν στη νευροµυϊκή διέγερση.
Ηλεκτρολύτης είναι οποιαδήποτε ουσία που περιέχει ελεύθερα ιόντα και συμπεριφέρεται σαν μέσο αγωγής ηλεκτρισμού.
Οι ηλεκτρολύτες είναι απαραίτητοι για τις συσπάσεις των μυών, ώστε ο άνθρωπος να κινείται, να ανασαίνει, να γίνεται η κυκλοφορία του αίματος και γενικά να διατηρεί την ευρωστία του.
Σε ακραίες συνθήκες θερμοκρασίας, όταν π.χ. κάνει πολλή ζέστη, λόγω της έντονης εφίδρωσης και της αναπνοής, το σώμα αποβάλλει ένα μεγάλο ποσό νερού που εμπεριέχει τους ηλεκτρολύτες. Το ίδιο μπορεί να συμβεί και μετά από έντονη άσκηση.
Σε αυτές τις περιπτώσεις χρειάζεσαι αναπλήρωση των ηλεκτρολυτών είτε μέσω κάποιων ενεργειακών ποτών είτε μέσω των κατάλληλων τροφών.
Εύκολοι τρόποι αναπλήρωσης των ηλεκτρολυτών
-Προσθέστε μια πρέζα αλάτι σε ένα ποτήρι νερό και πιείτε το αργά. Εάν είστε άρρωστοι ή έχετε δουλέψει σε εξωτερικό χώρο με ζέστη για περισσότερο από 40 λεπτά, αυτός είναι ένας γρήγορος τρόπος για να αναπληρώσετε τα επίπεδα νατρίου στον οργανισμό σας. Αν έχετε υψηλή πίεση πάντως, θα πρέπει να αποφεύγετε το αλάτι.
-Φάτε μια μπανάνα για να αναπληρώσετε το κάλιο στον οργανισμό σας. Πιείτε ένα ποτήρι νερό μαζί για να βοηθήσετε την απορρόφηση του καλίου. Το καλοκαίρι προτιμήστε το καρπούζι που καταπολεμά την αφυδάτωση και είναι επίσης ένα φρούτο υψηλής περιεκτικότητας σε κάλιο.
-Φτιάξτε το δικό σας αθλητικό ποτό για να αναπληρώσετε τους χαμένους ηλεκτρολύτες. Προσθέστε 1/4 του κουταλιού του γλυκού αλάτι, 1/4 του κουταλιού του γλυκού σόδα, το χυμό από 1/2 φλιτζάνι πορτοκάλι και 2 κουταλιές της σούπας ζάχαρη σε 1 λίτρο νερού και έπειτα ανακατέψτε το μείγμα.
-Πιείτε φυσικό νερό καρύδας που θα βρείτε στα καταστήματα που πουλάνε βιολογικά προϊόντα ή σε σούπερ μάρκετ. Το νερό καρύδας είναι αναζωογονητικό, ενυδατικό και σας παρέχει μια καλή δόση καλίου.
-Αναπληρώστε το μαγνήσιο τρώγοντας μπρόκολο ή σπανάκι και το ασβέστιο τρώγοντας ένα μπολ γιαούρτι, τυρί με χαμηλά λιπαρά ή ένα ποτήρι γάλα.

Δευτέρα 24 Αυγούστου 2015

Ψωμί με αλεύρι ολικής άλεσης (σπιτίσιο)

Ψωμί με αλεύρι ολικής άλεσης
Υλικά για 3-4 ψωμιά:
  • 2 κιλά αλεύρι ολικής άλεσης
  • μισό ποτήρι φυτικό λάδι (φιστικέλαιο, σογέλαιο κ.α) 
  • μια κοφτή κουταλιά αλεσμένο γλυκάνισο
  • ένα κουταλάκι του γλυκού αλάτι (προαιρετικό)
  • ένα κουταλάκι του γλυκού μαγιά του ψωμιού ( ίσταντ σαξές)
Σημ.: Ειδική προσοχή απαιτείτε στην προετοιμασία της μαγιάς, γιατί απ' αυτήν εξαρτάται τόσο η γεύση του ψωμιού όσο και ο χρόνος διατήρησής του.

Προετοιμασία μαγιάς

α) Χρησιμοποιείτε με κάθε δυνατή ακρίβεια η ποσότητα της μαγιάς που αναγράφεται στα υλικά της συνταγής πιο πάνω.
β) 4-5 ώρες πριν από τη χρήση της την ετοιμάζουμε ως εξής:
Παίρνουμε ένα ποτήρι χλιαρό νερό (όχι ζεστό), ρίχνουμε μέσα τη μαγιά (ένα κουταλάκι του γλυκού), ανακατεύουμε καλά να λιώσει. Ύστερα το χύνουμε σε ένα μπολ, ρίχνουμε ένα ποτήρι αλεύρι και ανακατεύουμε καλά ώσπου να σχηματιστεί κρέμα. Σκεπάζουμε το μπολ για 4-5 ώρες ώσπου να μπει.

Παρασκευή του ψωμιού

Ρίχνουμε όλα τα πιο πάνω υλικά σε μια μεγάλη λεκάνη και τα ζυμώνουμε μαζί με χλιαρό νερό όσο πιο καλά μπορούμε. Πλάθουμε με τα χέρια τα ψωμιά και τα βάζουμε σε σινιά ή φόρμες, που προαλείφουμε με λίγο λάδι. Ύστερα καλύπτουμε τα σινιά με μάλλινο ύφασμα και περιμένουμε μιάμιση - δύο - τρεις ώρες για να μπουν (να ψηλώσουν μέσα στα σινιά). Τέλος περνάμε τα σινιά σε φούρνο με ψηλή θερμοκρασία και όταν τα ψωμιά ψηθούν ύστερα από μιάμιση ώρα περίπου, ρίχνουμε τη θερμοκρασία κατά 50 βαθμούς για μισή ώρα για να ξεροψηθούν.
Το ξεροψημένο ψωμί είναι υγιεινότερο από το μαλακό.
Σχετικά με το ψωμί, καλό είναι να έχουμε τις εξής γνώσεις:
α) Να χρησιμοποιούμε όσο το δυνατό ψωμί ολικής άλεσης.
β) Αν το ψωμί είναι ολικής άλεσης, να τρώμε γύρω στα 150 γραμμάρια την ημέρα.
γ) Να μην τρώμε ψωμί η συγγενικά τρόφιμα, μακαρόνια, πουργούρι, πίτες κ.λ.π μαζί με ξινά φρούτα ή χυμούς. Είναι συνδυασμός βλαβερός.
δ) Σπάνια να χρησιμοποιούμε άσπρο αλεύρι και προϊόντα του. Το άσπρο αλεύρι είναι τροφή επεξεργασμένη και συνεπώς φτωχό σε υγιεινές ουσίες

Παρασκευή 21 Αυγούστου 2015

The coolest workout

Water Exersice 
Do you want to enjoy your outdoor summer exercise without that sweaty, sticky feeling? How about hopping in the pool and doing your workout the luxurious way? The pool just might be the only place where you can workout and not feel sweaty.
So it's too hot to walk or run outside, you say? Don't feel like riding a bike or playing tennis in the brutal heat? Do you want to enjoy your outdoor summer exercise without that sweaty, sticky feeling? How about hopping in the pool and doing your workout the luxurious way? The pool just might be the only place where you can do cardiovascular work, toning and stretching without even feeling like you've broken a sweat! Cardiovascular: The Warm-Up
Swimming laps is one of the best things you can do to strengthen your heart and lungs. If you're a decent swimmer and enjoy lap swims, spend a few minutes a day at it to warm up for toning and stretching.
Otherwise, walking or running in the pool is just as effective. It may sound easy, but just try it! If you go in up to your shoulders and run, you'll get your heart rate up with no problem. It may be very difficult to sustain at first, but try to build up your time to at least twenty minutes. One very important thing to remember is to keep your feet as fully planted as possible while you do your pool exercises, especially when walking and running. If you tiptoe (which people tend to do without realizing it), your calves will be killing you the next day. Keep those heels down!
Toning: Eight Great Moves You Can Do In The Pool
The wonderful thing about water is that it gives you natural resistance with absolutely no impact to the joints. For those with severe arthritis or other joint problems, it offers the perfect alternative to lifting weights. You really can tone up in the pool. Just like weight training, your muscles are contracting against resistance, becoming stronger with each session.
There are exercises you can do for every muscle group, and your risk of injury is extremely low. Think about exercises you do with free weights. The beauty of resistance training is that it is very easily modified. Anything that you do with dumbbells can be translated into a water exercise. If you already have a routine with free weights, you have a license to create your own water move that does the same thing.
Be creative, but also be mindful at all times of your body position (which can be thrown off in the water). Keep your weight distributed evenly and check your posture often. Keep your abdominals tucked in to support your back throughout every exercise. Don't bend, stretch or reach any further than you do on land. It takes time to grow accustomed to the gravitational difference in water, but as your experience grows, your body will become more in-tune with the water. Here are a few examples of modified free weight exercises:
Modified Free Weight Exercises For The Water:

    Quadriceps - Learn More
    For the quadriceps (front of the thighs), hamstrings and glutes: Stand with your feet hip-width apart in shallow water with your arms bent at your sides, hands out flat with fingers together and palms up. Slowly bend your knees into a squat position, sticking your derriere out behind you (don't worry about looking silly - you're under water!). Do not allow your knees to extend beyond your toes, but try to simulate a sitting-in-a-chair position. Cupping your hands, keeping your back neutral (not arched) and abs tucked in, exhale and stand up straight. Turn your hands to return to the starting position. Be very careful to maintain perfect form throughout this exercise. Hips & Glutes - Learn More
    For hips and glutes: Facing the edge of the pool, hold on with both hands and slowly bring one leg out to your side, keeping your back straight. Exhale while you bring it up as high as you comfortably can without turning at the ankle (this probably won't be as high as you could if you did turn your ankle). Bring it back down and repeat, doing a full set for each leg. For glutes: KICK! You can breeze around on a kickboard or hold onto the side of the pool, but the scissoring motion is great for the buttocks and hamstrings, and it indirectly tones the abdominals. What could be more fun than this?
    Back & Shoulders - Learn More
    For the back, shoulders and arms: Do pull-ups. Grasp the side of the pool and lower your body as far as your arms will allow. Keeping your knees bent, exhale and pull yourself up as high as you can (the range of motion for this will vary greatly from one person to another). For the chest: Standing in water up to your neck, reach your hands out to each side, with your elbows unbent and your palms forward. Slowly bring them together, clapping your hands, and then turn your hands to return to the starting position.
    Triceps - Learn More
    For triceps: Stand straight, with your open hands palms-down on the surface of the water. Keeping your elbows locked at your sides (pretend they're glued to your ribcage), exhale and push down until your hands are beside your hips. Turn your hands and bring them back to the starting position.
    Biceps - Learn More
    For biceps: Bring your open hands to the side of each hip, palms forward, with your fingers close together. Exhale as you slowly bend at the elbow to bring your hands toward your shoulders.
    Biceps - Learn More
    For abs, you can simulate crunches, or here's a toughie: stand with your back to the side of the pool, holding onto the rim with your elbows. Keeping your knees unbent, slowly bring both legs up to a sitting position and hold it for ten seconds. Do not hold your breath, though. Breath slowly throughout this exercise. Then bend at the knee to bring them down, repeating this as many times as you'd like to. Be careful to keep your back straight throughout this exercise.
There are lots of gadgets available for toning; you can get these at most department stores or athletic supply stores. They make the work a little more challenging and possibly give you speedier results, but it's better to begin water exercise without them. Once you feel like you need to push yourself a little harder, go ahead and use them. They'll add a new flavor to your old workout, keeping you motivated and interested.
Stretching: The Dessert
Just about any of the stretches you do on land can also be done in the water. When you're finished with your toning, hold the side of the pool with one hand, stand on one foot, bend the other knee and grasp your ankle with your free hand to stretch your quadriceps and hip flexors. Hold the side of the pool with one hand and turn your body by pointing your toes away from the wall to stretch your biceps and pectorals.
There are many, many stretches that you can do. Just make sure that you're properly warmed up (this takes a little longer in the pool) and keep your feet flat on the floor at all times.
Finito! You're done. Remember that your perceived exertion is a little off in the pool - you may feel like you didn't work that hard, but you did. You also may be a little sore the next day, so don't push yourself too hard until you know how much you can handle.
IMPORTANT NOTE: YOU ARE NOT A FISH! You don't have gills to keep your body hydrated, and it is possible to become dehydrated in the pool, so make sure you drink water before and after your workout. Once working out in the pool becomes a part of your summer lifestyle, you may begin to think you're a fish, but that's only because pool exercise is so fun, it has you hooked!

Παρασκευή 7 Αυγούστου 2015

The Ultimate Full-Body Kettlebell Workout

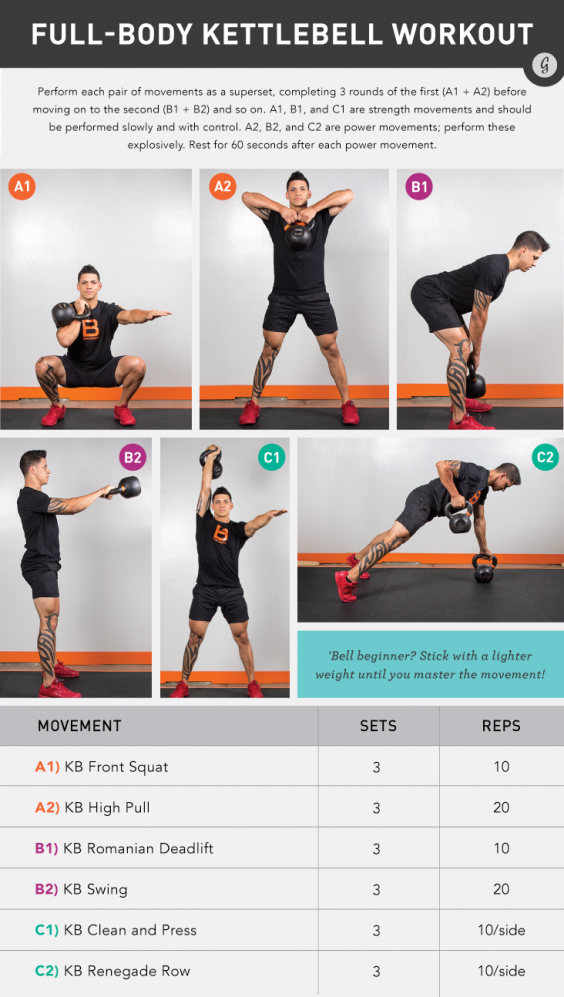
The Ultimate Full-Body Kettlebell Workout for Any Fitness Level


They may look like cast iron doorstops, but kettlebells are meant for anything but lying around. Case in point: Studies show that training with kettlebells yields pretty incredible improvements (up to 70 percent!) in aerobic capacity, balance, strength, and explosive power . The best part? You don’t have to be a pro athlete to experience these kick-butt benefits.
With that in mind, we turned to Greatist expert Rob Sulaver, a trainer, coach, and the founder of Bandana Training, for a routine that will help you feel comfortable using a kettlebell—all while delivering a head-to-toe workout. You’ll perform a strength move (in which your movement is slow and controlled) and then a power move (in which your movement is explosive—without sacrificing proper form), taking little rest before moving on to the next pair of exercises.
Since the power exercises can be challenging for beginners, Sulaver suggests sticking to a lighter weight until you master the movements. Once you're familiar with with each movement, you can start using heavier kettlebells. You'll know you're using the proper weight for each movement when you can complete each of the reps and rounds with good form, but feel like you can't perform additional reps once you've finished the workout.

Perfect Your Technique

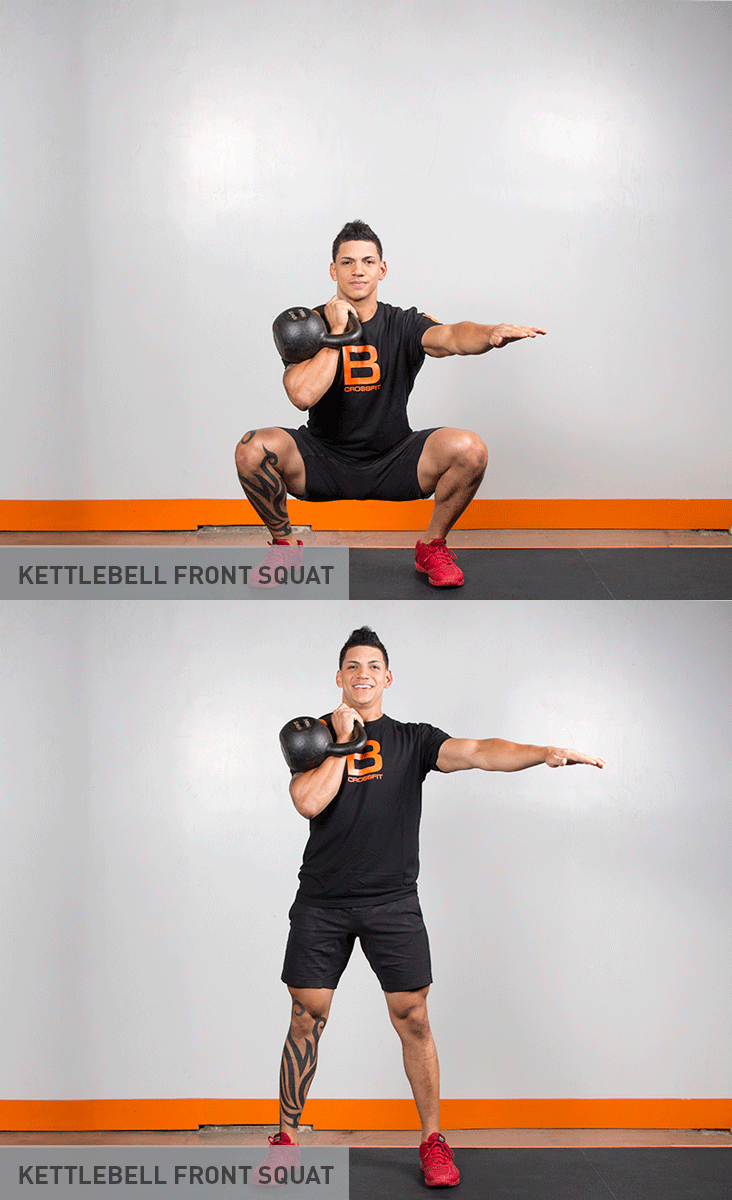
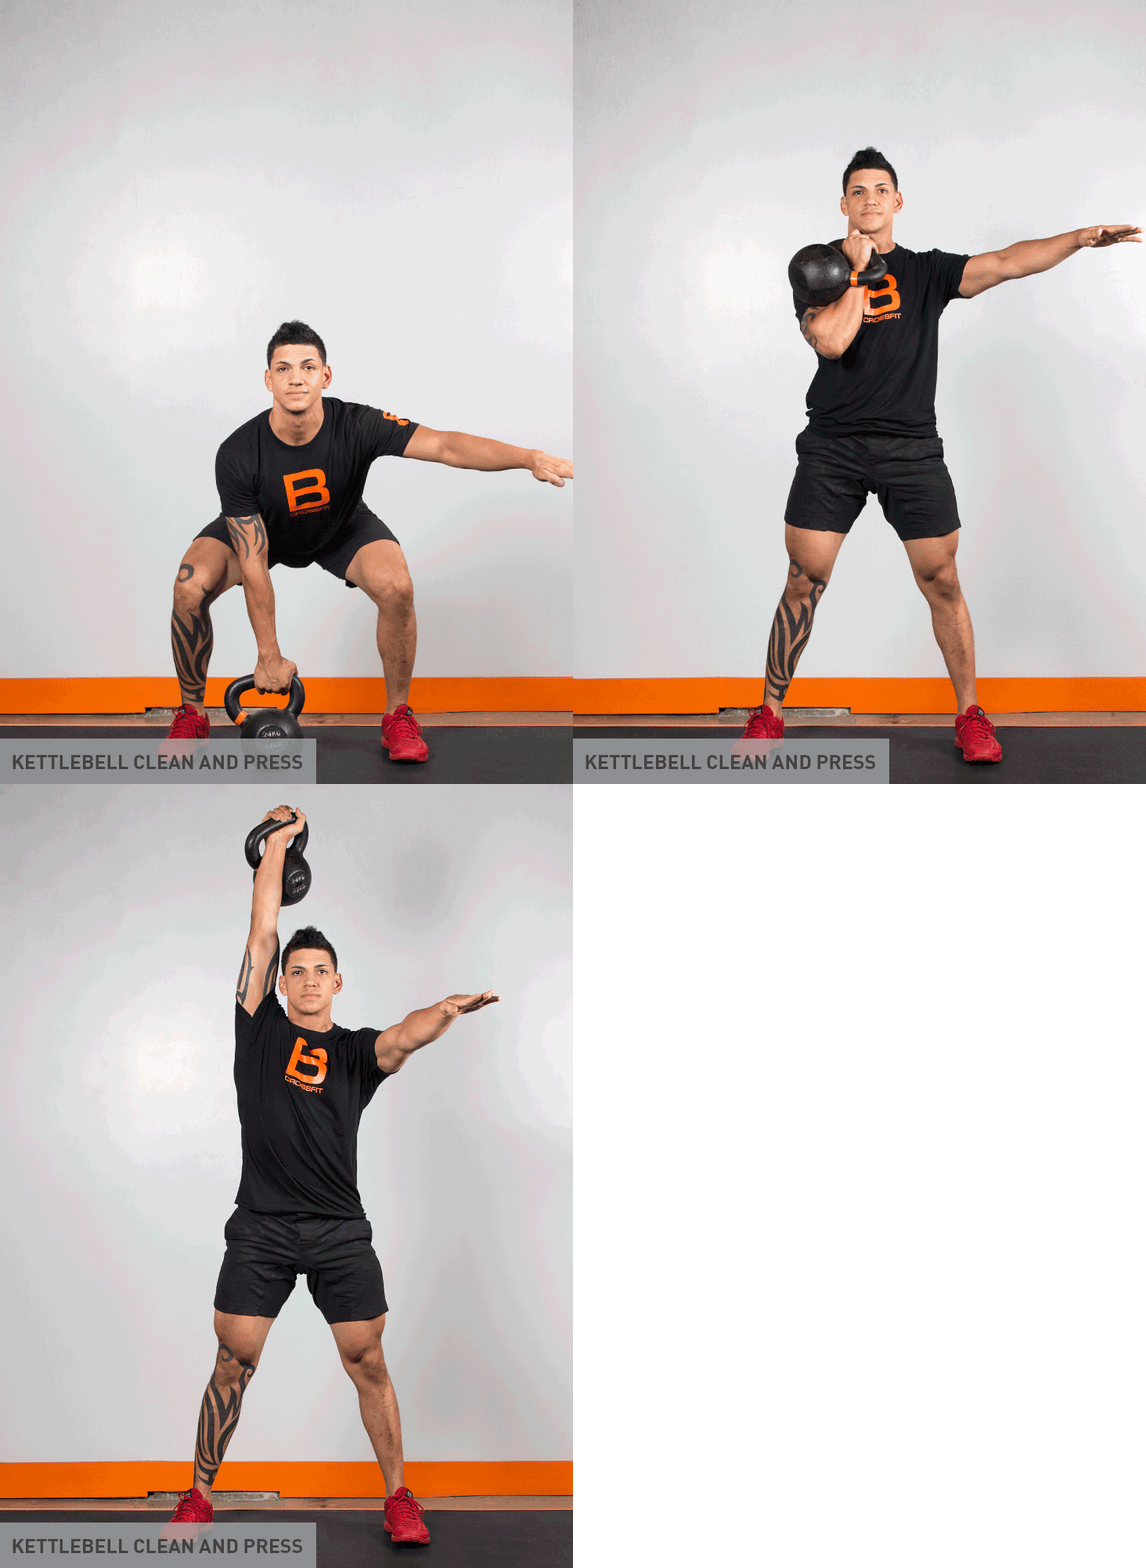
Check out the GIFs below for a quick guide on how to execute these movements properly and safely.


READ THIS NEXT: 22 Kick-Ass Kettlebell Exercises
Recipe Central

KETTLEBELLEXERSICE FOR KICK ASS

 KETTLEBELLEXERSICE FOR KICK ASS
Kettlebells are all bells, no whistles. Resembling a mini bowling ball with a handle, kettlebells are great for cardio, strength, and flexibility training . Start by picking up the weight of your choice—women usually grab between eight and 16 kg weights, while men go for 16 to 32 kg, though these weights vary depending on the exercises of choice. (No harm in starting low and working your way up!) Reps and sets will depend on intensity and fitness levels, for most of these moves, we recommend aiming for 3-5 sets of 10-30 reps with good form. (We suggest starting with a trainer or kettlebell aficionado to make sure everything’s kosher). Ready to rock? Let’s give these ketlebells a swing, snatch, or clean!

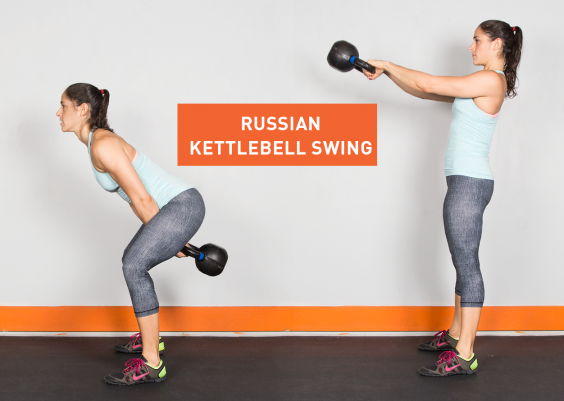
1. Russian Kettlebell Swing

Targets: Shoulders, back, hips, glutes, legs
Level: Beginner
How to: To do the perfect kettlebell swing, stand up straight, with feet a bit wider than hip-distance apart. Grab the handle with both hands, keeping the palms face down and arms in front of the body. Maintain a slight bend to the knee and drive the hips back, lowering the body—but not too low (this isn't a squat!). Then, in a fluid motion, explosively drive the hips forward while swinging the kettlebell, keeping the glutes and core engaged. Remember: The motion should come from the hips, not the arms, as the body returns to standing. Lower the weight back down between the legs and keep this swinging motion going for 12 to 15 reps.
2. Single-Arm Kettlebell Swing

Targets: Shoulders, back, hips, glutes, legs
Level: Beginner-Intermediate
How to: This movement is just like the two-handed swing, but uses one hand at a time. Swing the kettlebell up with one arm, but still swing the other arm to help drive momentum. Alternate hands when the kettlebell is behind the legs; aim for 10 to 12 reps with each arm.

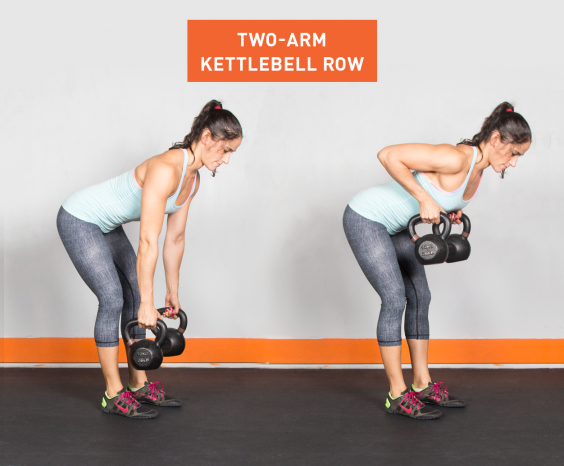
3. Two-Arm Kettlebell Row

Targets: Back, arms, shoulders
Level: Beginner-Intermediate
How to: Grab two kettlebells for this one. (Double the pleasure, double the fun, right?) Place them in front of the feet and bend the knees slightly. Next, bend over to grab both kettlebells and pull them towards the stomach, keeping the elbows close to the body and the back straight. Lower the weights, repeat for 12 to 15 reps max, feel like a champ.
4. Kettlebell Figure-8

Targets: Arms, back, abs
Level: Intermediate
How to: Looking to impress a certain someone at the gym? Then try this: Start with legs a bit wider than hip-width distance apart, and lower yourself into a quarter-squat position. (Keep that back straight and chest up!) Grab the kettlebell with the left hand and swing it around the outside of the left leg and then back between the legs. Next, pass the kettlebell to the right hand and swing it around the outside of the right leg. Keep this motion going, similar to the classic basketball drill! Can you do a minute straight? (Be sure to switch directions half-way through!)

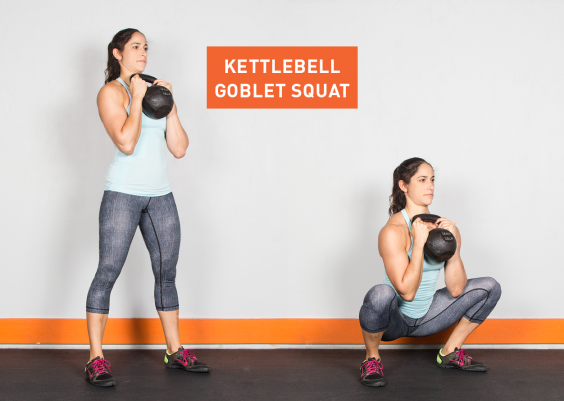
5. Kettlebell Goblet Squat

Targets: Legs, glutes, back
Level: Intermediate
How to: What’s a squat without a kettlebell in hand? Stand up straight, holding the kettlebell in front of the chest with both hands, keeping the elbows close to the body. Start squatting by driving the heels into the ground and pushing the hips back until the thighs are parallel to the ground or just below. Return to standing, and repeat for 15-20 reps (or more!) Just remember: quality over quantity!
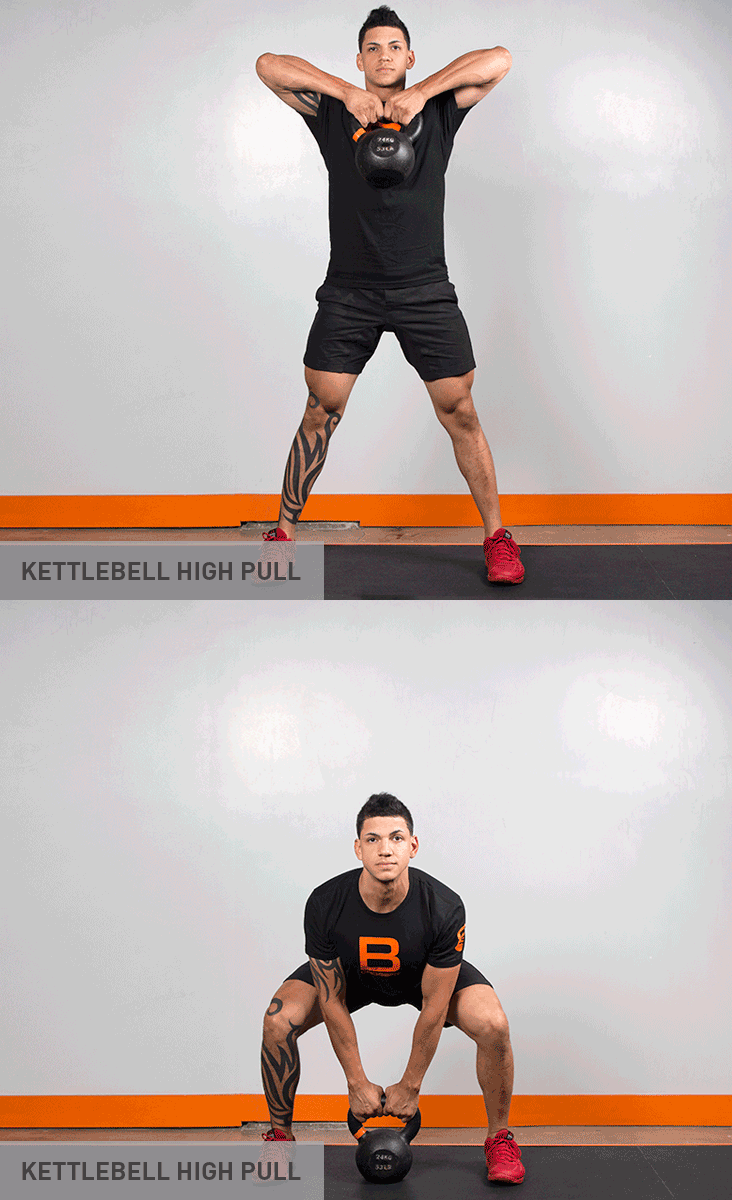
6. Kettlebell High Pull

Targets: Shoulders, arms, glutes, legs
Level: Intermediate
How to: Turn those toes out 45 degrees with feet a bit wider than shoulder-width apart. Place the kettlebell on the ground between both legs and begin to squat while keeping the core engaged, and grip the kettlebell handle with one hand. Then, using force from the hips, push through the heels to rise to standing, pulling the kettlebell upwards while the elbow drives up. Lower back down and switch arms. Shoot for 10 to 12 for each arm.

7. Kettlebell Lunge Press

Targets: Shoulders, back, arms, abs, glutes, legs
Level: Intermediate
How to: Here’s a new way to spice up those lunges. Stand up straight while holding the kettlebell in front of the chest with two hands, arms bent and palms facing each other. Lunge forward with one leg while raising the kettlebell overhead (raise the roof!). Return to standing while returning the kettlebell to the chest. Try for 10-15 reps on each leg.


8. Kettlebell Sumo High-Pull

Targets: Back, legs, shoulders, arms
Level: Intermediate
How to: We promise no wrestling is involved. Start with the kettlebell between the feet, set a bit wider than hip-distance apart. Grab onto the handle with both hands with the knees bent and hips back. Then, pull the kettlebell to the shoulders while the knees straighten and elbows rise. Remember: The force is coming mostly from the hips, the arms pulling at the very end. Keeping the core engaged the whole time, move the weight back down by the ground and repeat for 12-15 reps.

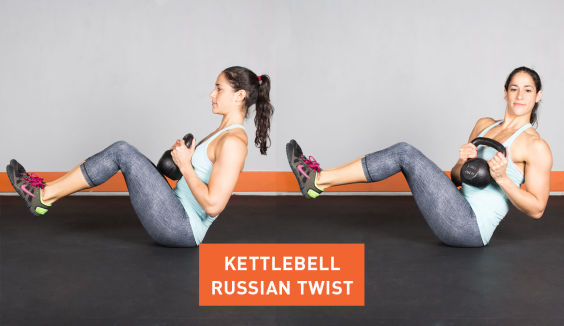
9. Kettlebell Russian Twist

Targets: Abs, obliques
Level: Intermediate
How to: Forget crunches. Sit with the legs bent and feet flat on the floor, about hip-distance apart. Hold the kettlebell with both hands at the chest, and then lean back to a 45 degree angle. Here’s the fun part: Rotate the torso from left to right by twisting at the waist and swinging the kettlebell across the body. See how many you can do, with perfect form of course!
10. Kettlebell Windmill

Targets: Shoulders, back, abs, obliques, hips
Level: Advanced
How to: Hold the kettlebell in the right hand and angle the feet 45 degrees away from the right arm. Raise the kettlebell overhead, lock the arm, and keep your eyes on the weight (which will help keep the shoulders aligned!). Shift your weight onto the right leg and begin bending forward at the waist. Keep the right arm extended overhead as the body bends forward and the left arm is pointed toward the ground. (For all you yogis out there, this should feel similar to triangle pose.) Lift back up slowly, staying in control. Repeat for 6 to 8 reps on each side.

11. Single-Arm Kettlebell Floor Press

Targets: Chest, arms, core
Level: Intermediate
How to: Lie on the ground with your legs straight. (Nope, it’s not time for savasana!) Grab a kettlebell by your side and, with the palm facing in, press the weight straight up while rotating the wrist (so the palms face the feet). Bring the kettlebell back down to the starting position, and repeat for 6 to 8 reps.

12. Kettlebell Slingshot

Targets: Back, arms, abs, obliques
Level: Intermediate
How to: No rocks or rubber bands required for this move. Keep feet shoulder-width apart, and hold the kettlebell in front of the body, arms extended at chest level. Swing the kettlebell behind the back with one hand, then reach back with the opposite hand to grab it, swinging the kettlebell to the front of the body. Continue round 'n round for 8-12 reps, then switch directions!

13. Side Step Kettlebell Swing

Targets: Legs, glutes, back
Level: Intermediate-Advanced
How to: This move is like a traveling kettlebell swing—now we’re going places! Grab a kettlebell and start with the basic two-handed swing (see move No. 1). When the bell is down between the feet, step the right foot out to the right; then, when the bell is up, bring the left foot to meet the right (so the legs come together). Keep side-steppin' your way to the right (10 to 15 steps), then head on back the other way, leading with the left foot.

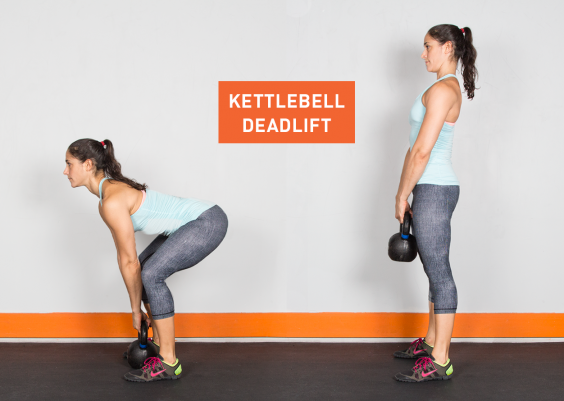
14. Kettlebell Deadlift

Targets: Legs, glutes, arms, back, abs
Level: Intermediate-Advanced
How to: Who says you need a barbell to deadlift? Stand with the kettlebell between the feet on the floor. Squat down and grab a hold of the handle with both hands while the back remains flat. Engage the core, tighten those glutes, and keep the arms extended as the body rises on up, kettlebell and all! Aim for 12 to 15 reps, maintaining proper form throughout.
15. Kettlebell Clean

Targets: Legs, butt, back
Level: Advanced
How to: Start with the kettlebell between the feet. Begin to swing upwards: Shrug the shoulders, pulling the body and 'bell up to the shoulder. The 'bell should end in the rack” position: resting on the forearm, which is tucked close to the body, the fist at your chest. Bring the weight back down to the floor and repeat for 10 to 15 reps.

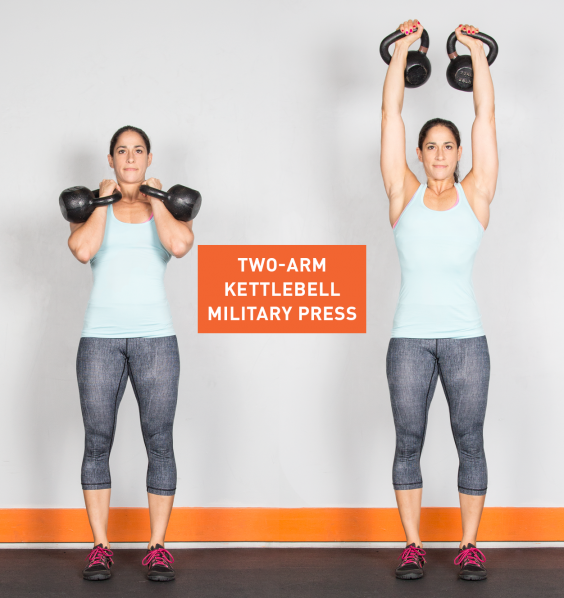
16. Two-Arm Kettlebell Military Press

Targets: Shoulders, arms, back
Level: Advanced
How to: Made it through move the kettlebell clean without breaking a sweat? Grab two kettlebells and clean them to the rack” position. Then, press the kettlebells up while leaning forward at the waist so the weights are positioned behind the head. Bring them back down to the shoulders and continue pressing for 10 to 20 reps, depending on the weight you’re pushin’.
17. Single-Arm Kettlebell Split Jerk

Targets: Shoulders, chest, back, legs
Level: Advanced
How to: Start by cleaning the kettlebell to the shoulder, finishing with the palm facing front. Next, bend the knees and press the kettlebell overhead while jumping into a split jerk position. (Stay steady!) Return to standing while the kettlebell remains overhead, and then lower the weight. Aaand repeat! Shoot for 4 to 6 on each side for starters.

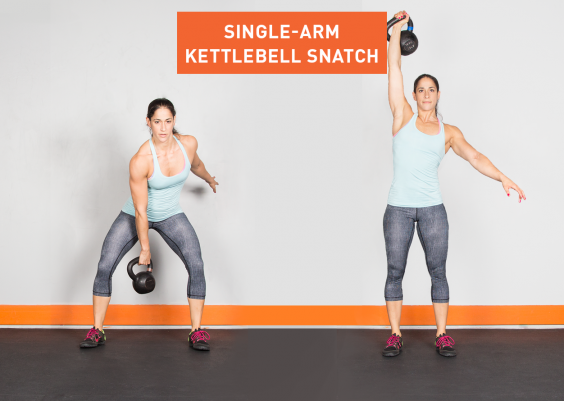
18. Single-Arm Kettlebell Snatch

Targets: Shoulders, chest, back
Level: Advanced
How to: Start with a kettlebell between the feet with the knees bent. Then, explode up onto your toes, pulling the kettlebell until it reaches the chest with the elbow tucked in. From there, bring the weight overhead (hold on tight!). Then bring it back down close to the ground—that’s one rep; try for 6 to 8!
19. Kettlebell Power Plank With Row

Targets: Abs, arms, back
Level: Intermediate/advanced
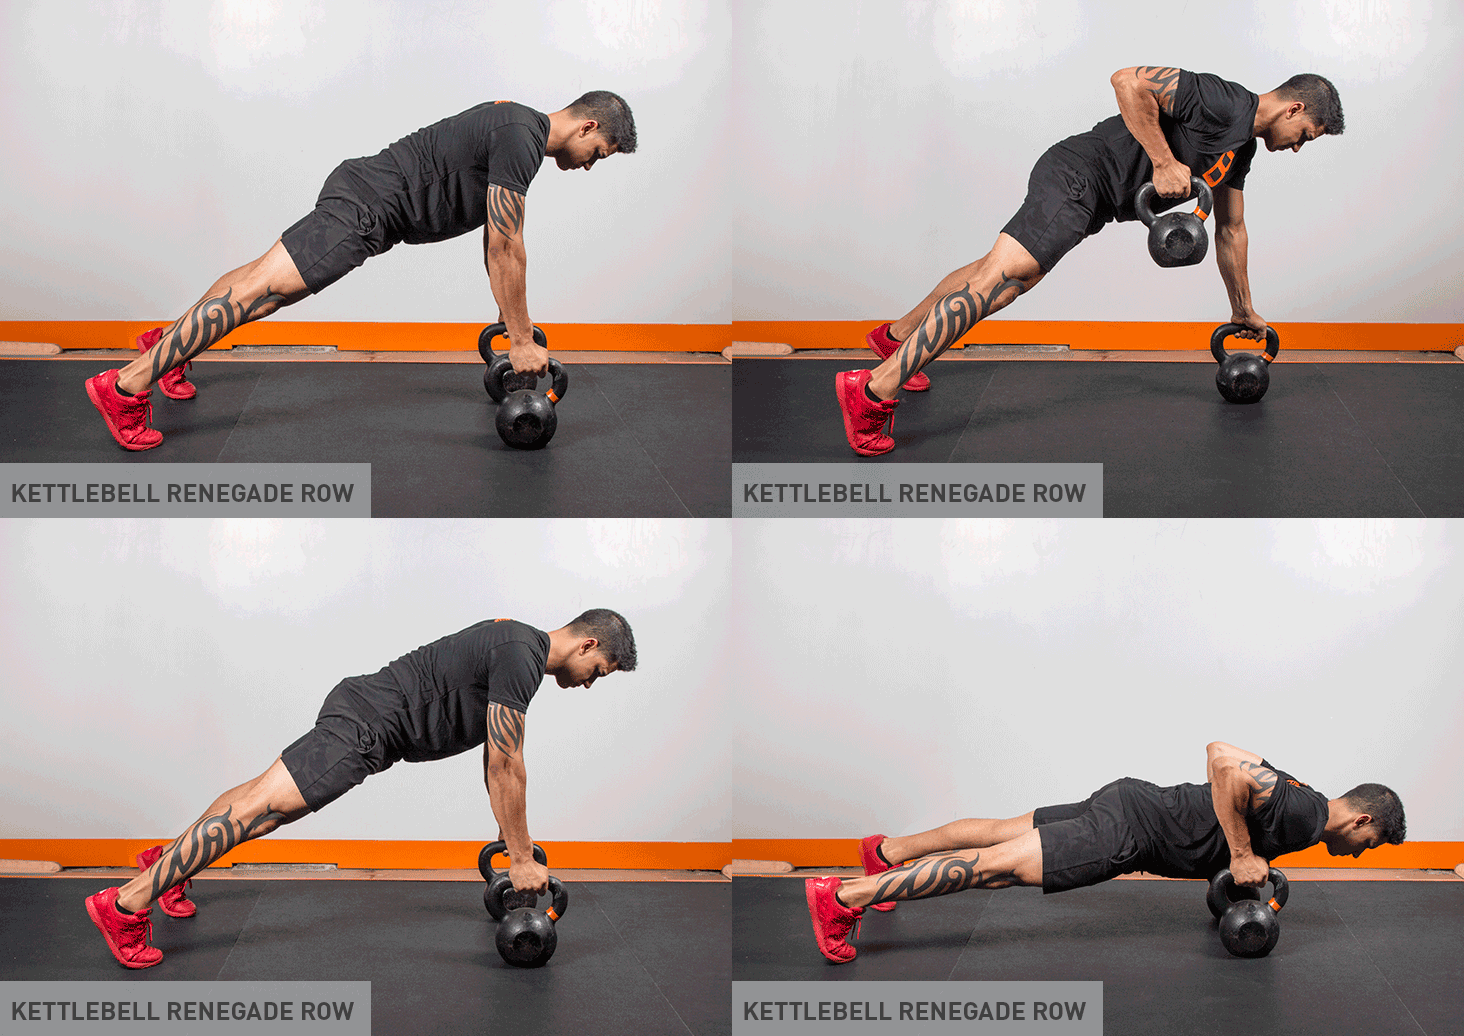
How to: Think of this move as the fancy plank. Start in a plank position, but with hands grasping two kettlebell handles. Then, lift one kettlebell up so it reaches the hip— remember to keep the elbow in! Lower back down and repeat with the opposite arm. Do 6 to 8 on each side, or until you feel the burn!

20. Kettlebell Half Get-Up

Targets: Abs, arms, back
Level: Intermediate-Advanced
How to: It’s time to get low. Lie down on your back with legs straight out. Extend the right arm straight up, kettlebell in hand. Next, bend the left knee and begin to rise, with the left arm keeping the body propped up. Feel the abs burn? You’re doing things right! Sit all the way up, then carefully return to starting position. Knock out 8 to 10 reps per side if you’re up for the challenge.

21. Kettlebell Push-Up

Targets: Chest, arms, back
Level: Intermediate/advanced
How to: This move is simply a push-up, but with kettlebells included! Grab hold of each handle in the usual start position, then lower the body before pushing back up. It’ll definitely feel challenging with those hands on handles rather than on the floor! Shoot for 10-15 reps.

22. Kettlebell Push-Up With Row

Targets: Chest, arms, back
Level: Advanced
How to: Let’s take this push-up up a notch! Begin in a push-up position with the right arm holding the kettlebell. Perform a push-up and, at the top, lift the right elbow by squeezing the shoulder blades together with the weight about six inches behind the body. Then return back to the starting push-up position, pushin’ for 5 to 8 reps with each arm. Kettlebells are a great way to spice up the usual lifting routine. As with traditional strength training, two days a week is a great place to start—but don’t hesitate to weave those kettlebells into the standard weightlifting routine (dumbbells, bodyweight exercises, and cardio included!). Just remember to give each muscle group a break (48 hours should usually do it), and don’t forget to try these out with a trainer before swingin’ solo. Using proper form is key for a workout that’s safe, effective, and fun!